Photoshop教程-打造奇幻美丽的立体炫图
作者:网友整理
炫图相册1.4.1 21.97M / 简体中文
点击下载
摄影教程PS大师安卓版v1.7 正式版 44.58M / 简体中文
点击下载
ps教程app安卓最新版(photoshop学习应用) v1.7.38 免费版 50.82M / 简体中文
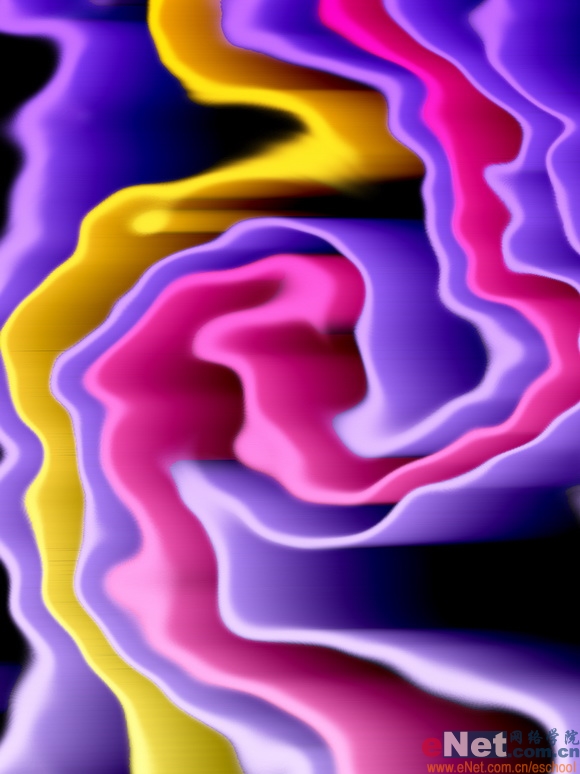
点击下载先看一下最终效果:
制作工具:Photoshop CS
制作过程:
1、新建一个文件。设置前景色为黑色,按Alt+Delete键将背景填充为黑色,效果如图01所示。

2、按X键切换前景色和背景色。新建图层1,单击工具箱中的“画笔工具”在画面中绘制粗细不同的竖条纹,效果如图02所示。

[page]
3、新建图层2,执行菜单栏中的“滤镜”“渲染”“云彩”命令,效果如图03所示。

4、执行菜单栏中的“滤镜”“模糊”“高斯模糊”命令,在弹出的对话框中设置半径为18像素,如图04所示,图像效果如图05所示。

 5、执行“文件”“存储为”命令,将上面的图像存储为PSD格式。
 6、隐藏图层2,选择图层1,执行菜单栏中的“滤镜”“扭曲”“旋转扭曲”命令,在弹出的对话框中将角度设置为350度,如图06所示,图像效果如图07所示。


[page]
7、将前景色和背景色设置不同的颜色,新建图层3,单击工具箱中的“渐变工具”,选择线性渐变,从上到下填充渐变,图像效果如图08所示。

8、将图层3的图层混合模式设置为正片叠底,图像效果如图09所示。

9、选择图层1,单击工具箱中的魔棒工具,在窗口中单击其中一个条纹。将前景色和背景色设置渐变颜色,选择图层3,单击渐变工具,从上到下填充渐变,取消选区,图像效果如图10所示。

10、选择图层1,单击工具箱中的魔棒工具,在窗口中再选择其中一个条纹。将前景色和背景色设置渐变颜色,选择图层3,单击渐变工具,从上到下填充渐变,取消选区,图像效果如图11所示。

[page]
11、按Ctrl+Shift+E键合并可见图层,再按Ctrl+J键复制粘贴背景图层得到背景副本图层。将前景色设置为黑色,选择背景图层,按Alt+Delete键将背景填充黑色。
12、选择背景副本图层,执行菜单栏中的“滤镜”“扭曲”“置换”命令,在弹出的对话框中设置参数,如图12所示。单击确定,在弹出的对话框中选择刚才存储的文件,图像效果如图13所示。


11、按Ctrl+Shift+E键合并可见图层,再按Ctrl+J键复制粘贴背景图层得到背景副本图层。将前景色设置为黑色,选择背景图层,按Alt+Delete键将背景填充黑色。
12、选择背景副本图层,执行菜单栏中的“滤镜”“扭曲”“置换”命令,在弹出的对话框中设置参数,如图12所示。单击确定,在弹出的对话框中选择刚才存储的文件,图像效果如图13所示。
[page]
15、按Ctrl+F键四次重复风滤镜,图像效果如图17所示。

16、按Ctrl键选择背景副本和背景副本2,按Ctrl+T键将图像变形,最终效果如图18所示。
加载全部内容